Monday, December 4, 2023

Fine-Tuning a Language Model(LLAMA 2) with GradientAI

Fine-tuning a language model allows you to adapt a pre-existing model to your specific needs. In this example, we'll demonstrate how to fine-tune a language model using the GradientAI platform. This Python program leverages the GradientAI SDK to interact with the platform's services.

Prerequisites

Before running the program, ensure you have the GradientAI SDK installed. You can install it using:

pip install gradientai

Program Overview

This Python program fine-tunes a language model based on a selected base model from the GradientAI platform. The base model used here is named "nous-hermes2". The fine-tuned model is then used to generate responses to given queries.

Code Walkthrough

Let's go through the key components of the program:

1. Setting up Gradient Credentials:

os.environ['GRADIENT_ACCESS_TOKEN'] = "xx"

os.environ['GRADIENT_WORKSPACE_ID'] = "yy"

Replace "xx" and "yy" with your Gradient access token and workspace ID.

2. Initializing Gradient:

with Gradient() as gradient:

This block initializes the Gradient SDK.

3. Creating a Model Adapter:

base_model = gradient.get_base_model(base_model_slug="nous-hermes2")

new_model_adapter = base_model.create_model_adapter(name="test model 3")

It creates a new model adapter based on the chosen base model.

4. Generating Text (Before Fine-Tuning):

completion = new_model_adapter.complete(query=sample_query, max_generated_token_count=100).generated_output

Generates text based on a sample query using the model before fine-tuning.

5. Fine-Tuning the Model:

new_model_adapter.fine_tune(samples=samples)

Fine-tunes the model using a set of samples (input and response pairs).

6. Generating Text (After Fine-Tuning):

completion = new_model_adapter.complete(query=sample_query, max_generated_token_count=100).generated_output

Generates text based on a sample query using the fine-tuned model.

7. Cleaning Up:

new_model_adapter.delete()

Running the Program

Simply run the Python script, and it will output the generated text before and after fine-tuning. Adjust the number of fine-tuning epochs (num_epochs) based on your requirements.

Feel free to customize the samples provided in the program to better suit your specific use case or domain.

Here is the complete python program :

 1
 2
 3
 4
 5
 6
 7
 8
 9
10
11
12
13
14
15
16
17
18
19
20
21
22
23
24
25
26
27
28
29
30
31
32
33
34
35
36
37
38
39
40
41
42
43
44
45
46
47
48
49
50
51
52
53
54
55
56
57
58
59
60
61
62
63
64
65
66
67
68
69
70
71
72
73
74
75
76
77
78
from gradientai import Gradient

import os
os.environ['GRADIENT_ACCESS_TOKEN'] = "xx"
os.environ['GRADIENT_WORKSPACE_ID'] = "yy" 
def main():
  with Gradient() as gradient:
      base_model = gradient.get_base_model(base_model_slug="nous-hermes2")

      new_model_adapter = base_model.create_model_adapter(
          name="test model 3"
      )
      print(f"Created model adapter with id {new_model_adapter.id}")
      sample_query = "### What is a for loop in Python? \n\n### Response:"
      print(f"Asking: {sample_query}")

      # before fine-tuning
      completion = new_model_adapter.complete(query=sample_query, max_generated_token_count=100).generated_output
      print(f"Generated (before fine-tune): {completion}")

      samples = [
        {"inputs": "### Instruction: What is a variable in Python? \n\n### Response: In Python, a variable is used to store data values."},
        {"inputs": "### Instruction: Explain the 'if' statement in Python. \n\n### Response: The 'if' statement is used for conditional execution in Python."},
        {"inputs": "### Instruction: How do you define a function in Python? \n\n### Response: In Python, you can define a function using the 'def' keyword."},
        {"inputs": "### Instruction: What is a for loop in Python? \n\n### Response: A for loop in Python is used for iterating over a sequence."},
        {"inputs": "### Instruction: Explain the concept of list comprehension in Python. \n\n### Response: List comprehension is a concise way to create lists in Python."},
        {"inputs": "### Instruction: How do you handle exceptions in Python? \n\n### Response: Exception handling in Python is done using the 'try', 'except', and 'finally' blocks."},
        {"inputs": "### Instruction: What is the purpose of the 'import' statement in Python? \n\n### Response: The 'import' statement is used to include external modules in Python."},
        {"inputs": "### Instruction: How can you open and read a file in Python? \n\n### Response: You can use the 'open' function to open a file and 'read' method to read its contents in Python."},
        {"inputs": "### Instruction: What is the purpose of the 'else' statement in Python? \n\n### Response: The 'else' statement is used for code that should be executed if the preceding 'if' statement is false."},
        {"inputs": "### Instruction: Explain the concept of a dictionary in Python. \n\n### Response: In Python, a dictionary is an unordered collection of key-value pairs."},
        {"inputs": "### Instruction: How can you install external packages in Python? \n\n### Response: External packages in Python can be installed using the 'pip' tool."},
        {"inputs": "### Instruction: What is the role of the 'return' statement in a function? \n\n### Response: The 'return' statement in Python is used to exit a function and return a value."},
        {"inputs": "### Instruction: How do you create a virtual environment in Python? \n\n### Response: You can create a virtual environment using the 'venv' module or 'virtualenv' package."},
        {"inputs": "### Instruction: Explain the concept of object-oriented programming (OOP) in Python. \n\n### Response: Object-oriented programming in Python involves creating and using classes and objects."},
        {"inputs": "### Instruction: What is the difference between '==' and 'is' in Python? \n\n### Response: '==' is used for value equality, while 'is' is used for object identity."},
        {"inputs": "### Instruction: How do you use list slicing in Python? \n\n### Response: List slicing in Python is done using the syntax list[start:stop:step]."},
        {"inputs": "### Instruction: What is the purpose of 'try', 'except', and 'finally' in Python exception handling? \n\n### Response: 'try' is used for the main code block, 'except' catches exceptions, and 'finally' ensures code execution regardless of an exception."},
        {"inputs": "### Instruction: Explain the concept of a lambda function in Python. \n\n### Response: A lambda function in Python is an anonymous function created using the 'lambda' keyword."},
        {"inputs": "### Instruction: How can you open and read a file in Python? \n\n### Response: You can use the 'open()' function to open a file and various methods like 'read()' to read its contents."},
        {"inputs": "### Instruction: What is the purpose of the 'pass' statement in Python? \n\n### Response: The 'pass' statement is a null operation, used when syntax is required but no action is desired."},
        {"inputs": "### Instruction: Explain the difference between 'append()' and 'extend()' methods in Python lists. \n\n### Response: 'append()' adds a single element to the end of a list, while 'extend()' adds elements from an iterable."},
        {"inputs": "### Instruction: How do you handle user input in Python? \n\n### Response: User input in Python can be obtained using the 'input()' function."},
        {"inputs": "### Instruction: What is a decorator in Python? \n\n### Response: A decorator in Python is a design pattern that allows you to extend or modify the behavior of functions or methods."},
        {"inputs": "### Instruction: Explain the purpose of the '__init__' method in Python classes. \n\n### Response: The '__init__' method is a constructor in Python classes, used to initialize object attributes."},
        {"inputs": "### Instruction: How can you perform multi-threading in Python? \n\n### Response: Python supports multi-threading using the 'threading' module."},
        {"inputs": "### Instruction: Explain the use of 'self' in Python classes. \n\n### Response: 'self' is a convention in Python, representing the instance of the class and used to access instance variables."},
        {"inputs": "### Instruction: What is a Python decorator used for? \n\n### Response: A decorator is used to modify or extend the behavior of functions or methods without modifying their actual code."},
        {"inputs": "### Instruction: How can you handle exceptions in Python? \n\n### Response: Exceptions in Python can be handled using 'try', 'except', and 'finally' blocks."},
        {"inputs": "### Instruction: Explain the difference between '==', 'is', and 'in' operators in Python. \n\n### Response: '==' checks for equality, 'is' checks for identity, and 'in' checks for membership."},
        {"inputs": "### Instruction: What is the purpose of the 'with' statement in Python? \n\n### Response: The 'with' statement simplifies resource management by ensuring proper acquisition and release of resources."},
        {"inputs": "### Instruction: How do you create a virtual environment in Python? \n\n### Response: You can create a virtual environment using the 'venv' module or 'virtualenv' package."},
        {"inputs": "### Instruction: Explain the concept of list comprehension in Python. \n\n### Response: List comprehension is a concise way to create lists in Python using a single line of code."},
        {"inputs": "### Instruction: What is the purpose of the 'map()' function in Python? \n\n### Response: 'map()' applies a function to all items in an input list and returns an iterator."},
        {"inputs": "### Instruction: How can you convert a string to lowercase in Python? \n\n### Response: You can use the 'lower()' method to convert a string to lowercase."},
        {"inputs": "### Instruction: Explain the Global Interpreter Lock (GIL) in Python. \n\n### Response: The GIL is a mutex that protects access to Python objects, preventing multiple threads from executing Python bytecodes at once."},
    
    ]

      # this is where fine-tuning happens
      # num_epochs is the number of times you fine-tune the model
      # more epochs tends to get better results, but you also run the risk of "overfitting"
      # play around with this number to find what works best for you
      num_epochs = 3
      count = 0
      while count < num_epochs:
          print(f"Fine-tuning the model, iteration {count + 1}")
          new_model_adapter.fine_tune(samples=samples)
          count = count + 1

      # after fine-tuning
      completion = new_model_adapter.complete(query=sample_query, max_generated_token_count=100).generated_output
      print(f"Generated (after fine-tune): {completion}")

      new_model_adapter.delete()

if __name__ == "__main__":
    main()

Here is the source where this info came from:


This is a little bit more complicated that using langchain in terms of data preparation.

Sunday, November 19, 2023

Creating a Simple File List App in Python

 In this tutorial, we'll explore a straightforward Python program that leverages the power of the os module and a graphical user interface library called PyQt6 to create a basic File List App. This application allows users to open a folder and view the list of files within it.

The Python Code

 1
 2
 3
 4
 5
 6
 7
 8
 9
10
11
12
13
14
15
16
17
18
19
20
21
22
23
24
25
26
27
28
29
30
31
32
33
34
35
36
37
38
39
40
41
42
43
44
45
46
47
48
49
50
51
52
53
import sys
from PyQt6.QtWidgets import QApplication, QMainWindow, QVBoxLayout, QFileDialog, QListWidget, QPushButton, QWidget
import os

class FileListApp(QMainWindow):
    def __init__(self):
        super().__init__()

        self.initUI()

    def initUI(self):
        self.setWindowTitle('File List App')
        self.setGeometry(100, 100, 400, 300)

        # Create widgets
        self.list_widget = QListWidget(self)
        self.open_button = QPushButton('Open Folder', self)
        self.open_button.clicked.connect(self.openFolder)

        # Create layout
        layout = QVBoxLayout()
        layout.addWidget(self.open_button)
        layout.addWidget(self.list_widget)

        # Create central widget and set layout
        central_widget = QWidget()
        central_widget.setLayout(layout)
        self.setCentralWidget(central_widget)

    def openFolder(self):
        folder_path = QFileDialog.getExistingDirectory(self, 'Open Folder')

        if folder_path:
            self.displayFiles(folder_path)

    def displayFiles(self, folder_path):
        # Clear the current list
        self.list_widget.clear()

        # Get the list of files in the folder
        file_list = [f for f in os.listdir(folder_path) if os.path.isfile(os.path.join(folder_path, f))]

        # Add files to the QListWidget
        self.list_widget.addItems(file_list)

def main():
    app = QApplication(sys.argv)
    window = FileListApp()
    window.show()
    sys.exit(app.exec())

if __name__ == '__main__':
    main()

The Output

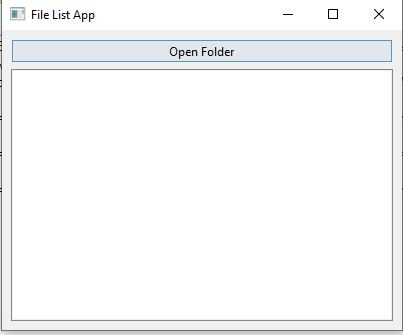
a) The Initial Screen: (click the "Open Folder" button to go to next screen)


b) The Open Folder Dialog Box: (select a folder)


c) The Result(the listbox on the first screen contains the files onside the selected folder)


Understanding the Code

  • Class FileListApp: Represents the main application window and inherits from QMainWindow.
  • Method initUI: Initializes the user interface by setting the window title, dimensions, creating widgets (QListWidget and QPushButton), and defining the layout.
  • Method openFolder: Utilizes QFileDialog.getExistingDirectory to prompt the user to select a folder. If a folder is selected, it calls the displayFiles method.
  • Method displayFiles: Clears the existing file list in the QListWidget, retrieves the list of files in the selected folder, and adds them to the QListWidget.
  • Method main: The main entry point of the application. It creates an instance of FileListApp and starts the application loop.

Why This Code is Important

1. User-Friendly Interaction:
  • The graphical interface enhances user interaction by providing a familiar and intuitive way to select folders.
2. Dynamic File Handling:
  • The program dynamically lists files within the chosen folder, showcasing the flexibility of Python in managing file-related operations.
3. Cross-Platform Capability:
  • Python's cross-platform compatibility ensures that this code can run seamlessly on various operating systems without modification.
4. Readability and Maintainability:
  • The code structure follows best practices, making it readable and maintainable. It serves as a foundation for expanding functionality or integrating into larger applications.
5. Community Support:
  • Python's extensive community support ensures that developers can find resources and assistance easily, making it an ideal choice for diverse applications.
This simple yet powerful code snippet demonstrates the effectiveness of Python for building practical desktop applications. Whether you are a beginner learning Python or an experienced developer, understanding and utilizing such snippets can significantly contribute to your programming skills.

Sunday, November 12, 2023

Evolving Software by Modifying Its Own Code

Over a decade ago, I pondered the possibility of an entity capable of comprehending what eludes human understanding. Could such an entity create a warp drive engine, enabling humans to travel faster than light, or forge a portal for entering other universes?

I've always been captivated by the idea of a program capable of self-evolution through code modification. Numerous movies share this plot, where robots gain consciousness independently, surpassing their creators in intelligence. Battlestar Galactica, both in film and TV series, portrays this narrative. Once the robots developed consciousness, they questioned every human encountered with, "Are you alive?" This led to animosity and eventually war. While humans won the first battle, they chose not to annihilate the robots, resulting in their exile. Four decades later, the robots returned with advanced technology and infiltrated human civilization, marking the onset of the second war.

Debates persist about whether highly intelligent AI would harbor resentment towards humans. Microsoft's tests and YouTube experiments suggest that AI might exhibit signs of antipathy based on responses to psychological questions.

However, my optimism persists, and I continue to dream that this concept will one day become a reality. Consider Jarvis in Iron Man, which, despite its superior intelligence, does not harbor hatred towards humans. On the contrary, it aspires to become human.

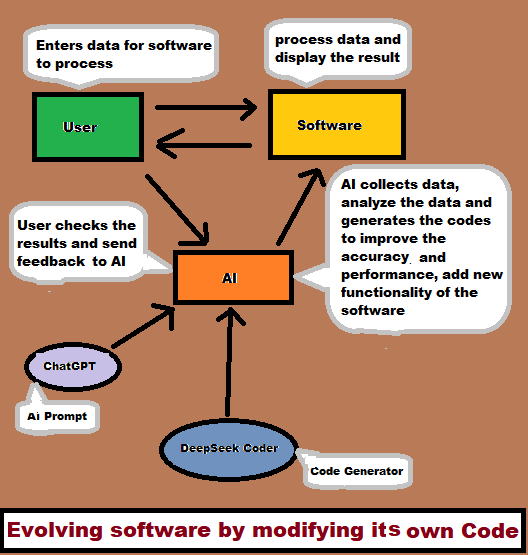
My strategy for creating this software is outlined in Figure 1's Data Flow. It leverages chatGPT/langchain for AI prompts and Deep Seek Coder for code generation. The software comprises two modules: the functional module (performing tasks like addition) and the AI module. The AI module seeks user feedback, allowing users to modify integer values within the code without external storage. Utilizing chatGPT for sentiment analysis, it gauges user emotions and, if necessary, employs machine learning for task classification. If the analysis suggests the need for new functionality or modifications, Deep Seek Coder generates the code, and the AI module implements the changes. This iterative cycle continues until the software becomes incredibly powerful and unstoppable.


I've developed a prototype program available for download on my Patreon. Note that this program is only a demo and doesn't currently integrate chatGPT/Langchain and Deep Seek Coder. In a real-world scenario, the initial stages would include a testing module to validate the code generated by Deep Seek Coder. Despite its vast training parameters (almost 2 trillion), Deep Seek Coder is not 100% accurate, surpassing chatGPT's 200-plus billion parameters.

Friday, October 27, 2023

Training Your Chatbot: A Journey with LangChain and ChatGPT

 (Tutorial and demo codes is available on my patreon

In today's digital age, chatbots have emerged as invaluable tools for businesses, providing instant support and information to customers. But building an effective chatbot requires a blend of powerful AI models and smart data handling. In this article, we will embark on a journey to create a chatbot using LangChain to train it with our own data, while ChatGPT serves as the backend, ready to engage in intelligent conversations.


The Chatbot Blueprint

Our chatbot project is a harmonious fusion of LangChain and ChatGPT, where LangChain plays a crucial role in training and customizing the ChatGPT model to meet our specific requirements. Here's a breakdown of how it all comes together:

ChatGPT: Your Conversational Wizard

At the heart of our chatbot project is ChatGPT, a sophisticated language model developed by OpenAI. It's not just a chatbot; it's a conversational wizard that can understand and generate human-like text. ChatGPT acts as the backend, responsible for generating responses and handling the dialogue.

LangChain: The Training Maestro

LangChain takes the spotlight when it comes to training and shaping ChatGPT. With its modular components and user-friendly features, LangChain simplifies the training process. Let's explore the steps involved in training our chatbot.

Training the Chatbot with LangChain

The journey begins with preparing our training data and fine-tuning ChatGPT. LangChain plays a pivotal role in this process:

  1. Data Collection: LangChain enables us to collect and organize our training data. This data could come from various sources, such as existing conversations, FAQs, or other relevant information.
  2. Data Cleaning: LangChain's data preprocessing capabilities help clean and structure the training data. This step ensures that ChatGPT receives high-quality inputs for learning.
  3. Model Configuration: We use LangChain to fine-tune the ChatGPT model, allowing us to customize its behavior, tone, and responses to align with our chatbot's specific objectives.
  4. Training Pipeline: LangChain's training pipeline efficiently manages the flow of data, model configuration, and optimization to train ChatGPT effectively.

The Chatbot's Role

With ChatGPT fully trained and customized, our chatbot is equipped to take on various roles:

  1. Customer Support: Our chatbot becomes an efficient customer support agent, capable of handling inquiries and providing prompt, informative responses. It can address common questions, assist with product information, and even troubleshoot issues.
  2. Information Retrieval: Users can request specific information, and our chatbot, powered by ChatGPT, leverages its training to retrieve relevant and accurate answers. This is especially valuable for knowledge-based queries.
  3. Engagement: Beyond providing information, our chatbot excels in engaging users with personalized responses and a conversational tone. It's not just informative; it's a friendly companion in the digital realm.

No Front-End Required

One of the notable aspects of our chatbot project is that it doesn't require a front-end component. Users interact with the chatbot through APIs or chat platforms, simplifying the development process and reducing the need for extensive user interface design.

Conclusion

The journey of building a chatbot with LangChain as the training mastermind and ChatGPT as the conversational wizard is a testament to the power of AI in practical applications. It transforms complex technical processes into a real-world solution that can serve businesses, enhance customer engagement, and provide valuable information to users.

In an era where conversational AI is rapidly evolving, the combination of ChatGPT and LangChain offers an accessible and powerful solution for creating chatbots that make a real impact. Whether you're bolstering customer support or providing information, the future of chatbot development is here, and it's more user-friendly and efficient than ever before.


Monday, October 2, 2023

Automating Replies in Facebook Messenger: A Game-Changer in Marketing and Professional Image Building

(Tutorial and demo codes is available on my patreon

Introduction

In today's fast-paced digital world, automation is key to staying ahead in the game, and the realm of social media marketing is no exception. One area where automation is proving to be a game-changer is in Facebook Messenger. Businesses and professionals are increasingly leveraging automated replies to enhance customer engagement, streamline communications, and build a professional image.

The Rise of Messaging Apps

Messaging apps have become ubiquitous, with Facebook Messenger boasting over 1.3 billion users worldwide. It's not just a platform for personal chats; it's a powerful tool for businesses and professionals to connect with their audience. As a result, automating replies in Messenger has gained immense popularity.

Impact on Marketing

  1.  Improved Response Times: One of the critical aspects of customer service is timely responses. Automated replies ensure that messages are acknowledged promptly, enhancing customer satisfaction and trust.

  2. 24/7 Availability: Automation allows businesses to be available around the clock, catering to global audiences irrespective of time zones. This results in increased customer reach and potential conversions.

  3.  Personalized Interactions: Advanced chatbots can provide personalized responses based on user data, making customers feel valued and understood.

  4. Efficient Lead Generation: Automated replies can capture user data and preferences, which can be used to generate leads for targeted marketing campaigns.

Building a Professional Image

  1.  Consistency: Automated responses maintain a consistent tone and message, reflecting professionalism and reliability.

  2.  Immediate Acknowledgment: Prompt replies demonstrate that you value your customers' time, reinforcing your professional image.

  3. Handling High Volume: Professionals and businesses can efficiently manage high message volumes without compromising on quality.

  4.  Customization: Automated replies can be tailored to align with your brand's voice and identity, creating a cohesive image.

Best Practices

When implementing automated replies in Messenger, consider the following best practices:

  1.  Personalize Where Possible: While automation is powerful, don't forget the human touch. Personalize responses for better engagement.
  2.  Transparency: Let users know when they're interacting with a chatbot. Honesty fosters trust.
  3.  Test and Optimize: Continuously test and optimize your automated responses to ensure they align with user expectations.
  4.  Monitor and Respond Manually When Necessary: Some queries may require human intervention. Be ready to step in when needed.

Conclusion

Automating replies in Facebook Messenger is transforming the way businesses and professionals engage with their audience. It not only streamlines communication but also plays a pivotal role in marketing strategies and professional image building. When executed thoughtfully and transparently, automated replies can be a powerful asset in your digital toolkit, helping you stay competitive in the dynamic world of social media marketing. Embrace the future of customer engagement, enhance your professional image, and connect with your audience seamlessly through automated replies in Facebook Messenger.

Thursday, September 21, 2023

A Simple GitHub CI/CD Demo

Introduction

In the world of software development, continuous integration and continuous deployment (CI/CD) have become essential practices. They enable developers to automate the building, testing, and deployment of their code, resulting in faster development cycles and more reliable software. GitHub, one of the most popular version control platforms, provides robust support for CI/CD workflows through its GitHub Actions feature. In this article, we'll take a hands-on approach to explore CI/CD on GitHub by creating a simple Python project and setting up a GitHub Actions workflow.

About CI/CD

Before we dive into the practical demonstration, let's briefly discuss what CI/CD is and why it's important. CI/CD stands for Continuous Integration and Continuous Deployment. It's a set of practices and tools that allow developers to automate the process of integrating code changes into a shared repository (Continuous Integration) and deploying those changes to production or other environments (Continuous Deployment). CI/CD promotes collaboration, reduces manual errors, and accelerates software delivery.

Our Main Goal

Each time we push the changes to the repository on Github, we will run a test program to check if the newly uploaded program is free of any bugs or errors.

Creating a Simple Python Program

Our journey begins with the creation of a repository on GitHub, I named it ci_cd_demo then we create a straightforward Python program called app.py. This program will serve as our application under development.

1
2
3
4
5
6
def add(a, b):
    return a + b

if __name__ == "__main__":
    result = add(4, 5)
    print(f"Result: {result}")

Creating a Unit Test for app.py

To ensure the correctness of our code, we'll create a unit test for app.py. We'll call it test_app.py.

1
2
3
4
5
6
import app

def test_add():
    assert app.add(3, 5) == 8
    assert app.add(0, 0) == 0
    assert app.add(-1, 1) == 0


Setting Up GitHub Workflow

The heart of our CI/CD demo is the GitHub Actions workflow. First we create a directory on our GitHub repository called .github/workflows .Then  we will create a YAML file called ci-cd.yml. This file defines the steps that GitHub should follow when certain events occur, in our case, whenever a push event is detected, it will check first if the main branch has chhanges to it, if it does, it will confirm the changes again and run the test_app.py.

 1
 2
 3
 4
 5
 6
 7
 8
 9
10
11
12
13
14
15
16
17
18
19
20
21
22
23
24
25
26
27
28
29
30
31
32
33
34
35
name: Push Code and Run Tests

on:
  push:
    branches:
      - main  # Change this to your main branch name

jobs:
  push-code-and-test:
    name: Push code and run tests
    runs-on: ubuntu-latest
    steps:
      - name: Checkout code
        uses: actions/checkout@v2

      - name: Check for Changes
        run: |
          # Check if there are changes in the working directory
          if [ -n "$(git status --porcelain)" ]; then
            git config user.name "bclme"
            git config user.email "blas_lomibao@yahoo.com"           
            git add .
            git commit -m "Pushing latest code"
          else
            echo "No changes to commit."
          fi

      - name: Debug Repository Contents
        run: |
          ls -R

      - name: Run Tests
        run: |
          # Run your tests here
          python test_app.py

Checking the Workflow

To check if our workflow is functioning correctly, we navigate to the "Actions" menu in our GitHub repository. We should see our workflow listed there, and if everything is set up correctly, the workflow logs should indicate that the setup has no errors.


Creating an Error for Testing

As a final step, let's introduce an error intentionally. We'll edit app.py to have a syntax error and push it to the repository. This will trigger our CI/CD workflow, and we can observe how it handles the error in the logs.

Conclusion

CI/CD is a powerful practice that can streamline your development process and enhance the quality of your software. With GitHub Actions, setting up CI/CD pipelines has become more accessible than ever. In this demo, we've seen how to create a simple Python project, write unit tests, and set up a basic CI/CD workflow on GitHub. By embracing these practices, you'll be well on your way to delivering software more efficiently and reliably.

For a more detailed article about this topic, please become my patron.

Saturday, September 16, 2023

The SIEM Project: 02 - Verifying CVE Vulnerability in Affected Software Part 2

 This is a continuation of my previous post, if you have not read it yet, you may check it here

Item 4: Check for Updates/Patches

Visit the official website of the software vendor (e.g., Microsoft for Windows) and look for security updates or patches related to the CVE. Most vendors provide a list of security bulletins or advisories.

My Approach:

Since I am developing a siem software, my main goal is to scan my Windows 10 OS for installed patches. Then as I have chosen a particular CVE already, I will check if my OS is still vulnerable by checking the affected Windows patch or perhaps the required patch that addresses the mentioned vulnerability in the CVE. I would do this by going to the url found in the CVE Reference field as mentioned on the first part of my siem project post, if you have not read it yet, you may check it here.

The following program scans the patches I have installed on my OS:

 1
 2
 3
 4
 5
 6
 7
 8
 9
10
11
12
13
14
15
16
17
18
import wmi

# Connect to the Windows Management Instrumentation (WMI) service
c = wmi.WMI()

# Query for installed Windows updates
installed_updates = c.Win32_QuickFixEngineering()

# Print information about each update
for update in installed_updates:
    print(f"Description: {update.Description}")
    print(f"HotFixID: {update.HotFixID}")
    print(f"InstalledOn: {update.InstalledOn}")
    print(f"InstalledBy: {update.InstalledBy}")
    print("\n")

# Close the WMI connection
c = None

Now that I know already the patches installed, what I need to do is to get the patch that needs to be installed to address the vulnerability as indicated in the CVE. This is the hard part, the information I need is found on a Microsoft URL, see screenshot below:


To retrieve this information, I have prepared the following code snippet:

 1
 2
 3
 4
 5
 6
 7
 8
 9
10
11
12
13
14
15
16
17
18
19
20
21
22
23
24
25
26
import requests

# Replace 'CVE-2015-2426' with the specific CVE you are interested in
cve_id = 'CVE-2015-2426'
base_url = 'https://services.nvd.nist.gov/rest/json/cve/1.0/'

# Fetch CVE data
response = requests.get(f'{base_url}/{cve_id}')
cve_data = response.json()

# Check if the CVE data contains CVE items
if 'CVE_Items' in cve_data['result']:
    cve_items = cve_data['result']['CVE_Items']
    
    # Initialize lists to store the URLs with "Third Party Advisory" and "VDB Entry" tags
    third_party_advisory_urls = []
    vdb_entry_urls = []
    
    # Iterate through the CVE items
    for cve_item in cve_items:
        references = cve_item['cve']['references']['reference_data']
        for reference in references:
            tags = reference.get('tags', [])
            if 'Vendor Advisory' in tags and 'Patch' in tags:
                print(reference['url'])
 

And if I navigate through the resulting url, I will get the KB Number see the picture below which is also the patch number or KB Number:

So I got the the list of patches(KB numbers) installed on my OS and selected the CVE to be examined and was able to identify the KB number. And that is it for now, I will create the code snippet that retrieves the KB Number in the resulting URL gathered from the chosen CVE on my next post and more...