Monday, November 28, 2022

SQL Injection Prevention checklist and Testing

 Nowadays, SQL Injection is still one of the deadliest form of attack that a hacker can do to a website. Improper coding, using outdated libraries and version of the programming language used, improper configuration of the webserver are the most common weakness that a hacker is looking for before they attack their target website.


I have prepared below a Sql Injection check list(in general practice) to disallow hackers to carry out  an attack successfully:

  1. Implement input validation and field masking at the view level.
  2. Ensure that your model layer properly uses placeholders.
  3. Check the data types of input parameters.
  4. Avoid insecure packages that have access to the database.
  5. Make use of application security monitoring features. Example: Detecting SQL Injection Attacks based on Text Analysis and Detection of SQL Injection Attack Using Machine Learning Techniques
  6. Enforce security policies and best practices with your team.

This other checklist may not apply to all programming languages but are is still useful to look at when developing a website/application:

  1. Don’t allow multiple statements
  2. Allow list user input
  3. Use Query Tokenization
  4. Use an allow instead of a deny list
  5. Use regular expression in input validations to remove any special characters
  6. Whitelist URLs for database access
  7. Escape and encode special database characters
  8. Use updated web development technologies and database setups (such as PDO instead of MySQLi) that include in-built SQLi protection
  9. Enforce the use of parameterized queries and prepared statements

I have a prepared below a method of testing whether a web page is vulnerable to SQL Injection attack. I used Burp Suite to carry out the attack and DVWA as the target website.

To set up the attack using burp suite, pls check the initial procedure I did on my previous post(A Simple Brute Force Attack using Burp Suite and DVWA as Target). Once that is done, open DVWA web application from the pre-configured browser. Then go to the SQL Injection but set the Security level to Low. Then, set "Intercept on"  on burp suite. Now enter any value to the text box at dvwa and press the button beside it. 


Then go back to burp suite.


Right click on the intercepted code and click the "Send to Intruder" from context menu that appeared.

Go to the Intruder menu and click the clear  button on right side with a section sign. Then highlight the text that was entered on the DVWA web page. In my case, I entered 'bbbbb'. Then press the add button located above the clear button.

Next go to the payloads section and leave all as is and enter the sql injection codes that you think can expose unknown data. I suggest to use the Sql Injection Word list from this website. To check the result you check how I did it in my previous post(A Simple Brute Force Attack using Burp Suite and DVWA as Target). And applying the same procedure, 


The response I got from all except the last were the same, there were no response but the last item yielded some result:


I also entered the same code in DVWA and got the following result:


And that's how to test the vulnerability of a web page.  This is not as simple as it may seem, having millions of code combination would be much useful to check the vulnerability of a webpage.


Inject a Python Code to Notepad

Code injection in windows 10 is another way of launching an attack. This happens after a malware has been downloaded and became dormant waiting for the right time to carry out its attack. Code Injection is a technique wherein a malware usually inject a code to a windows process while it is running. A very sophisticated code injector usually employs a combination of techniques like obfuscation to avoid virus detection, then it scans for its targeted application to inject the code which is usually a game where an unsuspecting user uses quite often and for an extended time. The goal of the attack is usually to launch an msfvenom payload. Once the payload is up and running, the attacker can listen to audio, open the webcam, upload another virus file or download sensitive information.

In today's post, I created simple code in python that injects a simple tkinter screen that gets displayed while notepad is being used. It can be any software, but my code does not include a process scanner so I only target notepad for demo purposes only. Most attackers usually use tkinter because it is lightweight and attackers can easily force download it if the module in not yet installed on the victim's computer.

The code injection code is all made possible the python library pymem. In some code injection viruses, they include importlib to modify the malware's own code to mutate itself to avoid anti virus detection and to target other software after a software has been infected. Code injection is also used as means to make the virus infect other files.

Disclaimer: This is just for educational and demo purposes only. Spreading viruses and hacking is illegal.

 Here is the code:

 1
 2
 3
 4
 5
 6
 7
 8
 9
10
11
12
13
14
15
16
17
18
19
20
21
22
23
import pymem

mem = pymem.Pymem("notepad.exe") 

mem.inject_python_interpreter() 
code = """ 
from tkinter import *
 
 
infect = Tk()  
infect.geometry("400x200") 
infect.title('You are owned!')   
# the label for user_name
user_name = Label(infect,
                  text = "You are owned!", font=("Arial", 25)).place(x = 20,
                                           y = 55) 


infect.mainloop()
"""

mem.inject_python_shellcode(code) 


Saturday, November 26, 2022

Python: Count Source IP Addresses from Captured Packets And Display on a Table

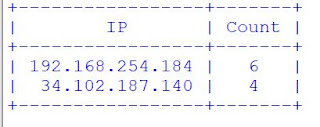
I am curious how many IP addresses I visited on a given period of time and how many times did I visited each one of these IP addresses. This is what I am trying accomplish using python and scapy. 

I think having access to this data would mean a lot to cyber security analysts because they would know in summary how much a user consumes network traffic on any given period of time. For example, youtube's ip address appeared 100 times every hour  everyday would seem to be unacceptable. It would seem to be something fishy about this network activity and would therefore be flagged as a security concern.

Here is the sample output:


The program counts the IP layer and when it reaches 10, it automatically exits or end the program. I will upgrade this by adding a user graphical interface in the future.


Here is the code:

 1
 2
 3
 4
 5
 6
 7
 8
 9
10
11
12
13
14
15
16
17
18
19
20
21
22
23
24
25
26
27
28
29
30
31
32
33
34
from scapy.all import *
from prettytable import PrettyTable
from collections import Counter
import scapy.all as scapy
from scapy.layers import http
from scapy.layers.inet import IP, TCP
srcIP = []
cnt = Counter()
x = 0
def sniffer(interface):
  scapy.sniff(iface=interface,store=False,prn=process_packet,filter='tcp')

def process_packet(packet):
   #print(packet.show())
   global srcIP, cnt, x
   
   try:
       srcIP.append(packet[IP].src)
       cnt[packet[IP].src] += 1
       x += 1
   except:
       pass
   
   if x==10:
       table = PrettyTable(['IP', 'Count'])
       for ip, count in cnt.most_common():
           table.add_row([ip, count])
       print(table)
       exit()


sniffer('Wi-Fi')


Friday, November 25, 2022

Part 2: Detect a Spam Email using Natural Language Processing

 This is a continuation of my previous post(Detect a Spam Email using Natural Language Processing). In this post I tried to enhance the second program(sample deployment of my spam detection model) by adding a Pyqt6 Window. The enhancements I made aside from adding a user interface are the following:

  1. On startup, it will try to retrieve any unread emails from my gmail account
  2. I added a button which will run in background to retrieve email from my gmail every 5 seconds
  3. Each time it receives a new email, it will check first the contents of the email if it is a spam or not and send notification.
  4. A "Stop Background Job" button is added to stop the thread and stop retrieving the email.

Please note that items #2 and #3 are still  work in progress. #2 should hide the Window and an icon in system tray should appear while #3 should be able to open the window when clicked.

I am still figuring out how to accomplish these tasks but I published it anyway because the basic functionalities already works. 

By the way, the "Compose" button is just a mere decoration, I plan to add this new function in its future version.

During my testing, I tried to copy the subject and contents on my original dataset. This data is classified as spam. My model correctly identified it as  spam but gmail did not. As far as I know  gmail implemented the most accurate spam detection model today but I am curious why it did not detected my spam email.

The design of my button is taken from my previous post(Button with PyQt6) . The background process is basically a multithreading job design to make the application responsive. You may check my previous post on this topic(PyQt6 Progress Bar Enhancement).


Here is the code:

  1
  2
  3
  4
  5
  6
  7
  8
  9
 10
 11
 12
 13
 14
 15
 16
 17
 18
 19
 20
 21
 22
 23
 24
 25
 26
 27
 28
 29
 30
 31
 32
 33
 34
 35
 36
 37
 38
 39
 40
 41
 42
 43
 44
 45
 46
 47
 48
 49
 50
 51
 52
 53
 54
 55
 56
 57
 58
 59
 60
 61
 62
 63
 64
 65
 66
 67
 68
 69
 70
 71
 72
 73
 74
 75
 76
 77
 78
 79
 80
 81
 82
 83
 84
 85
 86
 87
 88
 89
 90
 91
 92
 93
 94
 95
 96
 97
 98
 99
100
101
102
103
104
105
106
107
108
109
110
111
112
113
114
115
116
117
118
119
120
121
122
123
124
125
126
127
128
129
130
131
132
133
134
135
136
137
138
139
140
141
142
143
144
145
146
147
148
149
150
151
152
153
154
155
156
157
158
159
160
161
162
163
164
165
166
167
168
169
170
171
172
173
174
175
176
177
178
179
180
181
182
183
184
185
186
187
188
189
190
191
192
193
194
195
196
197
198
199
200
201
202
203
204
205
206
207
208
209
210
211
212
213
214
215
216
217
218
219
220
221
222
223
224
225
226
227
228
229
230
231
232
233
234
235
236
237
238
239
240
241
242
243
244
245
246
247
import sys
from PyQt6.QtWidgets import QApplication,  QWidget,  QPushButton, QTableWidget, QStyledItemDelegate, QTableWidgetItem
#from PyQt6.QtGui import  QPainter, QColor, QPen
from PyQt6.QtCore import  QEvent, QObject, QTimer, QThread
import email
import imaplib
import time
import multiprocessing as mp
import winrt.windows.ui.notifications as notifications
import winrt.windows.data.xml.dom as dom
import pandas as pd
import string
from nltk.corpus import stopwords
from nltk.stem import PorterStemmer
stemmer = PorterStemmer()
import joblib
import warnings
warnings.filterwarnings('ignore')
notif1 = 0
x = 0
xx = ''
breaker = 0
class Delegate(QStyledItemDelegate):
    def createEditor(self, parent, option, index):
        if index.data() == "100":
            return super(Delegate, self).createEditor(parent, option, index)

class Window(QWidget):

    def __init__(self):
        super(Window, self).__init__()

        self.initUI()

    def initUI(self):

        pb3 = QPushButton('Compose', self)
        pb3.setGeometry(25, 5, 100, 35)
        pb3.setStyleSheet('QPushButton {background-color: #2F569B; color: #d4d4d4;}')
        pb3.clicked.connect(self.onClick_pb3)
        self.setGeometry(25, 45, 600, 480)
        self.setWindowTitle('Zumail')

        self.pb4 = QPushButton('Run in Background', self)
        self.pb4.setGeometry(130, 5, 150, 35)
        self.pb4.setStyleSheet('QPushButton {background-color: #2F569B; color: #d4d4d4;}')
        self.pb4.clicked.connect(self.onClick_pb4)

        self.pb5 = QPushButton('Stop Background Job', self)
        self.pb5.setGeometry(285, 5, 150, 35)
        self.pb5.setStyleSheet('QPushButton {background-color: #2F569B; color: #d4d4d4;}')
        self.pb5.clicked.connect(self.onClick_pb5)
        self.pb5.setEnabled(False)
        
        self.createTable()
        self.show()
        
 
    def onClick_pb3(self):
 
       pass
    def onClick_pb5(self):
       global breaker
       breaker = 1
       self.pb4.setEnabled(True)
       self.pb5.setEnabled(False)
       print("thread was stopped")
    def process_text(self, text):
        no_punc = [char for char in text if char not in string.punctuation]
        no_punc = ''.join(no_punc)    
        return ' '.join([word for word in no_punc.split() if word.lower() not in stopwords.words('english')])

    def stemming (self, text):
        return ''.join([stemmer.stem(word) for word in text])

    def onClick_pb4(self):
       global notif1, breaker
       if breaker == 1:
           breaker = 0
           pass
       timer = QTimer(self)
       timer.timeout.connect(self.showtext)
       timer.start(5000)
       self.thread() 
       self.worker = WorkerThread()
       self.worker.start()
       self.pb4.setEnabled(False)
       self.pb5.setEnabled(True)
       notif1 = 1
       
    def showtext(self):
        global breaker
        if breaker == 1:
            pass
        else:
            self.recmail()
            
    def createTable(self):
        self.tableWidget = QTableWidget(self)
        self.tableWidget.viewport().installEventFilter(self)
  
        self.tableWidget.setRowCount(24)
        self.tableWidget.setColumnCount(3)
        self.tableWidget.setFixedSize(550, 415)
        self.tableWidget.move(25, 50)
        delegate = Delegate(self.tableWidget)
        self.tableWidget.setItemDelegate(delegate)
              
        self.tableWidget.setHorizontalHeaderLabels(['Sender', 'Date', 'Subject'])
        stylesheet = "::section{Background-color:rgb(179, 179, 179);color: white; bor  der-radius:14px;}"
        self.tableWidget.horizontalHeader().setStyleSheet(stylesheet)
        self.tableWidget.horizontalHeader().setStretchLastSection(True)
        self.tableWidget.verticalHeader().setStretchLastSection(True)
        self.recmail()

    def recmail(self):
        global x, notif1
        EMAIL = 'm******@gmail.com'
        PASSWORD = '*******'
        SERVER = 'imap.gmail.com'

        mail = imaplib.IMAP4_SSL(SERVER)
        mail.login(EMAIL, PASSWORD)
        mail.select('INBOX')
        status, data = mail.search(None, '(UNSEEN)')        
        mail_ids = []
        
        for block in data:
            mail_ids += block.split()

        for i in mail_ids:
            status, data = mail.fetch(i, '(RFC822)')
            for response_part in data:
        
                if isinstance(response_part, tuple):
                    message = email.message_from_bytes(response_part[1])
                    mail_from = message['from']
                    mail_subject = message['subject']
                    mail_date = message['date']
                    if message.is_multipart():
                        mail_content = ''

                        for part in message.get_payload():
                            if part.get_content_type() == 'text/plain':
                                mail_content += part.get_payload()
                    else:
                        mail_content = message.get_payload()
                    #print(f'From: {mail_from}')
                    #print(f'Subject: {mail_subject}')
                    #print(f'Content: {mail_content}')
                    xx =  mail_subject + ': ' + mail_content
                    xx = self.process_text(xx)
                    xx = self.stemming(xx)
                    filename = "model.sav"
                    bow = 'vect.sav'
                    vectorizer = joblib.load(bow)
                    message_bow = vectorizer.transform([xx])
                    loaded_model = joblib.load(filename)
                    result = loaded_model.predict(message_bow)
                    if result == [[0]]:
                        text = mail_from
                        it = QTableWidgetItem(text)
                        self.tableWidget.setItem(x, 0, it)
                        text = mail_date
                        it = QTableWidgetItem(text)
                        self.tableWidget.setItem(x, 1, it)
                        text = mail_subject
                        it = QTableWidgetItem(text)
                        self.tableWidget.setItem(x, 2, it)
                        x += 1
                        if notif1 == 1:
                            self.notif(mail_from)
                    else:
                        if notif1 == 1:
                            self.notif('Spam')

    def notif(self, arg1):
        app = '{1AC14E77-02E7-4E5D-B744-2EB1AE5198B7}\\WindowsPowerShell\\v1.0\\powershell.exe'
        nManager = notifications.ToastNotificationManager
        notifier = nManager.create_toast_notifier(app)
        if arg1 == 'Spam':
            zmail = "You've Got Spam!"
        else:
            zmail = "You've got Mail"
        tString = """
          <toast>
            <visual>
              <binding template='ToastGeneric'>
                <text>""" + zmail + """</text>
                <text>from """ + arg1.split('<')[0] + """</text>
              </binding>
            </visual>
            <actions>
              <action
                content="Delete"
                arguments="action=delete"/>
              <action
                content="Dismiss"
                arguments="action=dismiss"/>
            </actions>        
          </toast>
        """
        #print(tString)
        xDoc = dom.XmlDocument()
        xDoc.load_xml(tString)
        notifier.show(notifications.ToastNotification(xDoc))
        
    def eventFilter(self, source, event):
        #if self.tableWidget.selectedIndexes() != []:
            
        if event.type() == QEvent.Type.MouseButtonRelease:
                #if event.button() == QtCore.Qt.LeftButton:
            row = self.tableWidget.currentRow()
            col = self.tableWidget.currentColumn()
            if self.tableWidget.item(row, col) is not None:
                print(str(row) + " " + str(col) + " " + self.tableWidget.item(row, col).text())
            else:
                print(str(row) + " " + str(col))            
                    #self.test.leftClick(row, col)
                #elif event.button() == QtCore.Qt.RightButton:

                 #   row = self.tableWidget.currentRow()
                 #   col = self.tableWidget.currentColumn()
                 #   self.test.rightClick(row, col)
       
        return QObject.event(source, event)
class WorkerThread(QThread):
  
   def run(self):
     global breaker  
     print("thread started")
     if breaker == 1:
         pass
 
         #Window.recmail(Window)


def main():

    app = QApplication(sys.argv)
    ex = Window()
    sys.exit(app.exec())


if __name__ == '__main__':
    main()


Sunday, November 20, 2022

Detect a Spam Email using Natural Language Processing

A spam email may also be a phishing email. It targets unsuspecting users. Phishing emails usually contain various subjects that is designed to lure users to open the email. Like for example, a person desperately in need of money, when she opens her email, she has an email with subject line "You just won $1,000!" coming from acds@tr3smar1as.n3t. It would be very tempting for her so she opens it and the email contains "The Tres Marias is giving away $1,000, clicked this link to claimed your price hurry, th1s is offer is being given to first fiv3 claimerz". Once she clicks the link, a msfvenom or a virus was downloaded to her pc and her pc was compromised. 

To examine further the example email, the subject line sounds suspicious already, it is a compelling line that would attract curiousity even if the unsuspecting receiver is not in need of money. The sender's email seems to be obviously fake. No reputable company would use combination of numeric and alphanumeric characters in their domain name. And lastly the email body is full of grammatical errors. A desperate person would tend to ignore this and proceed to click the link anyway.

To prevent this from happening, a spam detect program must automatically delete emails like these as a first line of defense. 

In this post, I created a simple spam email detection in python using Natural Language Processing. It consist of 2 programs, the first program is the creation of the model including training, testing and saving the model for deployment.The second program is an example of how to deploy the model and how it is used to detect spam emails.

The data structure I used to train and test the model consists of 2 columns(1: subject with the email body; 2: spam indicator). The model has achieved 99% accuracy so it is useable and ready for actual deployment.


Here is the code:

1. Train and Test the model:

 1
 2
 3
 4
 5
 6
 7
 8
 9
10
11
12
13
14
15
16
17
18
19
20
21
22
23
24
25
26
27
28
29
30
31
32
33
34
35
36
37
38
39
40
41
42
43
44
45
46
47
48
49
50
import pandas as pd
import numpy as np
import seaborn as sns
import matplotlib.pyplot as plt
from nltk import word_tokenize
import string
from nltk.corpus import stopwords
from nltk.stem import PorterStemmer
stemmer = PorterStemmer()
from sklearn.feature_extraction.text import CountVectorizer
from sklearn.model_selection import train_test_split
from sklearn.naive_bayes import MultinomialNB
import joblib
from sklearn.model_selection import KFold, cross_val_score
import os
import warnings
warnings.filterwarnings('ignore')
df = pd.read_csv('emails.csv')
def count_words(text):
    words = word_tokenize(text)
    return len(words)

df['count']=df['text'].apply(count_words)
def process_text(text):
    no_punc = [char for char in text if char not in string.punctuation]
    no_punc = ''.join(no_punc)    
    return ' '.join([word for word in no_punc.split() if word.lower() not in stopwords.words('english')])

df['text']=df['text'].apply(process_text)
def stemming (text):
    return ''.join([stemmer.stem(word) for word in text])

df['text']=df['text'].apply(stemming)
vectorizer= CountVectorizer(
    ngram_range=(1, 3), 
    stop_words="english",
    lowercase=False,    
)

message_bow = vectorizer.fit_transform(df['text'])
X_train,X_test,y_train,y_test = train_test_split(message_bow,df['spam'],test_size=0.20)
nb= MultinomialNB()
nb.fit(X_train,y_train)
y_pred = nb.predict(X_test)
filename = "model.sav"
bow = 'vect.sav'
joblib.dump(nb, filename)
joblib.dump(vectorizer, bow)
kfold = KFold(n_splits=5,shuffle=True)
print("Accuracy using Cross Validation is :",np.mean(cross_val_score(nb,message_bow,df['spam'],cv=kfold,scoring="accuracy"))*100," %")

2. Sample Model Deployment:

 1
 2
 3
 4
 5
 6
 7
 8
 9
10
11
12
13
14
15
16
17
18
19
20
21
22
23
24
25
26
27
28
29
30
31
32
import pandas as pd
import string
from nltk.stem import PorterStemmer
stemmer = PorterStemmer()
import joblib
import os
import warnings
warnings.filterwarnings('ignore')
x=''
filename = "model.sav"
bow = 'vect.sav'
df = pd.read_csv('email 1.csv')
x =(df.iloc[0,0])
def process_text(text):
    no_punc = [char for char in text if char not in string.punctuation]
    no_punc = ''.join(no_punc)    
    return ' '.join([word for word in no_punc.split() if word.lower() not in stopwords.words('english')])


x = process_text(x)

def stemming (text):
    return ''.join([stemmer.stem(word) for word in text])
x = stemming(x)
vectorizer = joblib.load(bow)
print(vectorizer)
message_bow = vectorizer.transform([x])


loaded_model = joblib.load(filename)
result = loaded_model.predict(message_bow)
print(result)

Saturday, November 19, 2022

Windows Registry as Persistent Memory for Python Apps

I was trying to be creative by not using the traditional .ini file or a database to store application settings/configurations. Still, the windows registry is a common thing to do and is only for Windows OS but it sounds more complicated and a little bit hard to crack for the average user. It is equivalent of builtin flash memory in micro controllers which was used by SpaceHuhn in creating the nodemcu wifi packet sniffer.

Today, I created a simple program that reads/creates/modifies registry keys/values. So simple but very useful and sounds a little bit of old school but Windows Registry is definitely a good option for storing additional information that the application needs to work properly.

Here is the code:

 1
 2
 3
 4
 5
 6
 7
 8
 9
10
11
12
13
14
15
16
17
18
19
20
21
22
23
24
25
26
27
28
import winreg

REG_PATH = r"SOFTWARE\Zunz\HWID"

def set_reg(name, value):
    try:
        winreg.CreateKey(winreg.HKEY_CURRENT_USER, REG_PATH)
        registry_key = winreg.OpenKey(winreg.HKEY_CURRENT_USER, REG_PATH, 0, 
                                       winreg.KEY_WRITE)
        winreg.SetValueEx(registry_key, name, 0, winreg.REG_SZ, value)
        winreg.CloseKey(registry_key)
        return True
    except WindowsError:
        return False

def get_reg(name):
    try:
        registry_key = winreg.OpenKey(winreg.HKEY_CURRENT_USER, REG_PATH, 0,
                                       winreg.KEY_READ)
        value, regtype = winreg.QueryValueEx(registry_key, name)
        winreg.CloseKey(registry_key)
        return value
    except WindowsError:
        return None
print (get_reg('GUID'))

#Set Value 1/20 (will just write the value to reg, the changed mouse val requires a win re-log to apply*)
set_reg('EXPDAT', str(1102022))

Saturday, November 12, 2022

A Simple Event Log Viewer in Python

Windows Event Logs are very useful in analyzing the history of an attack. Every attacks that has taken place leaves a footprint and this can be found on the Windows Event Logs. Even if the attacker knows how to erase her footprint, there will still be a log event that records the deletion. But one prevention of this deletion of event logs is to have a redundant storage of the logs.

In today's post, I created a simple python program that will read some of the event logs(I prepared only one event which the File Modification Event). Ideally, Cyber Forensic Analysts would primarily look at the following Event Logs(Source: Monitoring Windows Event Logs - A Tutorial):

User logon/logoff
computer logon/logoff/restart
Access to objects, files and folders
System time is modified
Audit logs are cleared

Each of these events have different Data Structures, I have not studied the rest and so far, I only looked at the File Modification Event.

The program I created will read all 4663 events( the File Modification Event) that recorded the previous one hour and print at the terminal. I will try to add more features of this program in my future post. In my previous post(2 Python Programs that are useful in Cyber Security),  I have created a program that will monitor any file changes on a specific folder. The limitation of this program is, it does not detect who made the changes. That is one of the reasons why reading the event logs is the only way to display who made the changes.

The following fields are shown:

Event Category
Time Generated
Source Name
Event ID
Event Type
Event Data: Username that Modified the file and the File Modified.

 Here's an example:

Event Category: 12800
Time Generated: 2022-11-13 14:33:59
Source Name: Microsoft-Windows-Security-Auditing
Event ID: 4663
Event Type: 8
Event Data:
John C:\frontdoor\haha.py

The complete list of Event ID which served as my reference can be found at this article: Appendix L: Events to Monitor.

I also added a filter to exclude other usernames that are not valid username(just for some demo only).  In the future, I plan to save the retrieved event logs to mysql database and  create a dashboard that will read log events in real time and display it using plotly. Some existing dashboards on the internet will serve as my guide such as this one(source) :


By default, The event id 4663 is disabled, so to enable it, this guide shows how: How to enable file and folder access auditing in Windows Server. Another useful article about understanding windows log events is Windows Logging Basics. It serve also as one of my reference for writing this post.

And finally, here is the code:

 1
 2
 3
 4
 5
 6
 7
 8
 9
10
11
12
13
14
15
16
17
18
19
20
21
22
23
24
25
26
27
28
29
30
31
32
33
34
35
36
37
38
39
40
41
42
43
44
45
46
47
48
49
50
51
52
53
54
55
56
import win32evtlog # requires pywin32 pre-installed
import time
import datetime
import wmi

#import mysql.connector as mysql
w=wmi.WMI()
unames = []
for u in w.Win32_UserAccount(["Name"]):
    unames.append(u.Name)
print (unames )   
server = 'localhost' # name of the target computer to get event logs
logtype = 'Security' #'System' # 'Application' # 'Security'
hand = win32evtlog.OpenEventLog(server,logtype)
flags = win32evtlog.EVENTLOG_BACKWARDS_READ|win32evtlog.EVENTLOG_SEQUENTIAL_READ
total = win32evtlog.GetNumberOfEventLogRecords(hand)
begin_sec = time.time()
begin_time = time.strftime('%H:%M:%S  ', time.localtime(begin_sec))
number_of_hours_to_look_back = 1
seconds_per_hour = 60 * 60
how_many_seconds_back_to_search = seconds_per_hour * number_of_hours_to_look_back
def date2sec(evt_date):
    dt = datetime.datetime.strptime(evt_date, "%a %b %d %H:%M:%S %Y")
    return dt.timestamp()

while True:
    events = win32evtlog.ReadEventLog(hand, flags,0)
    if events:
        for event in events:
          the_time = event.TimeGenerated.Format()
          seconds = date2sec(the_time)
          if seconds < begin_sec - how_many_seconds_back_to_search: break
          
          if event.EventID == 4663 and  event.StringInserts[1] in unames:
          #if event.EventCategory == 'File System':  
            print ('Event Category:', event.EventCategory)
            print ('Time Generated:', event.TimeGenerated)
            print ('Source Name:', event.SourceName)
            print ('Event ID:', event.EventID)
            print ('Event Type:', event.EventType)
            #print(dir(event))
            data = event.StringInserts
          #print(dir(event.StringInserts))
            if data:
               
                print ('Event Data:')
                print(data[1] + ' ' + data[6])
                #for msg in data:
                #    print (msg)
            print(' ')
            #time.sleep(5)
    if seconds < begin_sec - how_many_seconds_back_to_search: break            


Enhancing my Python Serial Monitoring Program by Adding a Screen


Remember my post "Create a Wifi Captive Portal using a NodeMCU"? It has a python program that retrieves the user input from the wifi captive portal over serial port. This tiny program does not have a screen so I need to enhance it a little bit just to demo the threading features of python which I also mentioned in this post: PyQt6 Progress Bar Enhancement. The program is still very simple and very straightforward. The tricky part is the threading, it is what makes this program feasible. I also added 2 buttons(Start and Stop) and the function is quite obvious. 

Here is the screenshot of the screen:

Here is the code:

 1
 2
 3
 4
 5
 6
 7
 8
 9
10
11
12
13
14
15
16
17
18
19
20
21
22
23
24
25
26
27
28
29
30
31
32
33
34
35
36
37
38
39
40
41
42
43
44
45
46
47
48
49
50
51
52
53
54
55
56
57
58
59
60
61
62
63
64
65
66
67
68
69
70
71
72
73
74
75
76
77
78
79
80
81
82
83
import sys
from PyQt6 import QtGui
import serial
#import asyncio
import time
from PyQt6.QtWidgets import QTextEdit, QApplication, QMainWindow, QPushButton, QToolTip, QMessageBox, QLabel
from PyQt6.QtCore import QTimer, QThread, pyqtSignal, Qt
import multiprocessing as mp
arduinodata = ''
breaker = 0
class Window2(QMainWindow):                          
    def __init__(self):

        
        super().__init__()
        self.setWindowTitle("Serial MOnitoring")
        self.top = 200
        self.left = 200
        self.width = 300
        self.height = 350
        self.setGeometry(self.top, self.left, self.width, self.height)
        lbl1a =  QLabel('Credentials', self)
        lbl1a.setGeometry(5, 10, 290, 35)
        lbl1a.setStyleSheet('QLabel {background-color: #0E95A6; color: #d4d4d4;}')
        lbl1a.setAlignment(Qt.AlignmentFlag.AlignCenter)
        self.le = QTextEdit(self)
        #self.le.setEnabled(False)
        self.le.setGeometry(5, 50, 290, 250)
        self.pushButton = QPushButton("Start", self)
        self.pushButton.move(40, 313)
        self.stopButton = QPushButton("Stop", self)
        self.stopButton.move(160, 313)
        self.stopButton.setEnabled(False)
        self.stopButton.clicked.connect(self.stop_bot)
        timer = QTimer(self)
        timer.timeout.connect(self.showtext)
        timer.start(1000)
        self.thread()
        self.pushButton.clicked.connect(self.window3)
        self.show()

    def showtext(self):
        global arduinodata
        if arduinodata != '':
           print(arduinodata) 
           self.le.append(arduinodata)
           arduinodata = ''
        
    def stop_bot(self):
        global breaker
        self.pushButton.setEnabled(True)
        self.stopButton.setEnabled(False)
        breaker = 1
            
    def window3(self):
       self.pushButton.setEnabled(False)
       self.stopButton.setEnabled(True)
       self.worker = WorkerThread()
       self.worker.start()       
       #self.worker.update_progress.connect(self.showtext)
       
class WorkerThread(QThread):
   #update_progress = pyqtSignal(str) 
   def run(self):
     global arduinodata, breaker
     ser = serial.Serial('com4', baudrate=9600, timeout=1)
     ser.open
     while True:
         if breaker == 1:
             breaker = 0
             ser.close
             break
         arduinodata1 = ser.readline().decode('ascii')
         
         if arduinodata1 != '':
                arduinodata += arduinodata1         
                print(arduinodata)
     arduinodata1 = ''          
            
if __name__ == "__main__":
    app = QApplication(sys.argv)
    window = Window2()
    sys.exit(app.exec())